Monday, December 16, 2013

Instant Gratification

My husband and I were once serial remodelers.  Before we were married, we took turns remodeling my condo and his townhouse.  Within the first year of our marriage, we rented out those properties and bought an older single family home that was rather run-down, but in a great neighborhood.  After long, drawn-out, exhausting projects, such as ripping out carpet and refinishing the hardwood floors, we spent a few hours one weekend on a quick project: cleaning a fireplace surround and tiling the hearth.  It was straightforward, simple and very quick.  We were surprised at how gratifying a weekend project could be. We were so happy with it, we even took our Christmas card picture in front of the fireplace that year.

My new place mats remind me of that fireplace project.  Although I was looking forward to starting a field jacket for myself, we really needed some place mats.  My husband had complained about the old ones so often, that I felt guilty starting anything else before place mats.

I ordered some fabric on the internet (Fat Quarter Shop), not expecting them to be so "bright."  Some wine may have been consumed during my online shopping, so it should be no surprise that I was a little surprised when the fabric arrived.  I pictured a little girl's quilt, not elegant place mats for my table.  But I moved forward with my plan, nonetheless.
Lily Ashbury "High Street"

They were a simple, straightforward project and despite the bright colors, I really like the outcome.  Orange on one side, Green on the other, with a coordinating yellow bias binding tying the two fabrics together. The floral pattern has a diagonal line, which gave me an easy pattern to quilt.


They don't perfectly match my decor, but I they add a refreshing burst of color in a room that is mostly muted earth tones. They also coordinate nicely with my white porcelain.  The table in our "breakfast nook" is a small round table, and this size and shape work perfectly for it.

The only thing I wasn't happy with, was the fusible batting.  It was a great help during the construction and quilting, but I swear it shrunk.  The manufacturer's website stated that it didn't need to be pre-washed because polyester batting doesn't shrink, but it seems otherwise to me.  Not a huge deal, but they do require a quick press after laundering to lay flat.

I had so much fun with this project, I decided that place mats would make a great Christmas gift, so I made another set right away.  What a refreshing change from multiple pattern pieces, fitting, and what not.  I was also reminded how nice it is to sew with quilter's cotton.  In addition to the instant gratification, I get continued daily gratification, as we use them for every meal.  And they are so cheery!

Sunday, November 24, 2013

Simplicity 2153 - a "wearable muslin"

After the endless sewing of "The Couture Dress", I longed for a quick and easy project for me.  I really wanted a casual field jacket.  And lucky me -- Simplicity patterns were on sale.  I bought some cheap cotton/poly twill at Hancock to make a wearable muslin for myself.  I wasn't in the mood for any fussy fitting, I just cut a 14 and started sewing. According to the measurements, it may be a little on the small side for my waist and hips, but with the extra ease for a drawstring waist, I told myself that it should be fine as-is.
Simplicity 2153

What I had in mind for this project was a field jacket -- more safari, less M65 -- but I bought green fabric.  I have a hard time walking away from green.  It's not an olive drab, but it's still got a military vibe.  I tried to distress it with bleach, but I really don't think it changed a thing  -- it's still dark green.  Never mind that I already have a green rain coat and two green fleece jackets.
The look I was trying to achieve. [Who carries a purse in the jungle?]
As the jacket came together, it became more and more military to me.  Once the epaulettes were on, I started thinking "Colonel Klink", imagining myself shouting about the fuhrer or the luftwaffe and wearing a monocle.  I had a hard time getting that image out of my head.


It also seemed SO BAGGY.  It took me forever to finish sewing, partly because I was busy with other projects, but also because I wasn't too excited to see it finished.  I regretted not fitting the pattern better at all. When I looked at it hanging on the dress form, it reminded me of my dad's Marine uniform (in his size).  Not the look I was going for.
Not baggy, but almost exactly the same green of my jacket.
My daughter poked her head in a few times and told me how much she liked it.  "Ooooh, I like your jacket. I need one like it for my trip to Ireland.  Maybe in red."  "This is mine."  I snapped, although it did occur to me that the dark green would complement her coloring much better than mine.

Even though I called this a muslin, I flat-felled all the seams, added trim and flaps to the pockets - and added zippered pockets - and bought nice buttons and zippers for it.  Most of it was experimentation, so I suppose it can still be called a muslin.  However, I was disappointed that if I wanted to alter any of the seams, I would have to pick out part of those flat-felled seams.  Not impossible, just more work.
Zipper pocket & pocket flaps added

Convinced that I would probably not wear the jacket as-is, the next time my daughter stopped in to tell me how much she liked it, and lobby for a red one, I told her "It's too baggy for me.  You can have it."  "REALLY? I love it!" She was thrilled, and I was just happy someone would wear it.
The waist loosened
That was before the waist casing was in and I saw how darn cute it became when the waist was gathered.  And before the antique brass buttons were on, that complemented the green fabric and matched the zippers. It was very cute, and I'd given it away!  When I told Stephanie that I may want it after all, she got a bit defensive.  "No takesies-backsies."  And desperately tried to make me think it was too big for me:  "Besides, it looks dumpy on you."  I knew she was lying about the dumpy part.  It was really cute.
What a difference a waist makes!

But that's okay.  This was just a muslin.  Mine will be even better.  It will have:

  • higher armscyes, with narrower sleeves
  • a slightly wider waist casing
  • a narrower back or maybe an inverted back pleat
  • some length taken out of the upper back
  • lining, maybe...not sure yet
  • maybe cuffs for the sleeves

Besides, I already have three green jackets.  Maybe I need one in red.
She's worn it to school twice in one week -- I guess it's a winner.


Wednesday, November 13, 2013

A book bag for Sam

Sam needed a book bag, since larger backpacks are not allowed in the hallways at his school. The school provided cheap nylon bags that ripped the instant his binder was placed inside.  After repairing it twice, I offered my services.

He wanted fabric with variety, but none of the "licensed prints" worked for him.  Maybe a stripe?  Maybe a print?  Nope. There were no stripes or prints in the entire wall-to-wall, floor-to-ceiling merchandising space of the Hancock Fabric store that would possibly work for his bag.   "Can you make a fabric for me, Mom?"  After more than an hour walking around the store, I wearily agreed to "make him a fabric" and introduced him to the fat quarter corner.  Not just two different fabrics, or even just three or four, he had to have SIX different fabrics.  Six different fabrics that really didn't seem to coordinate.  The cashier appeared a bit confused when he told her we were making a bag.

His dad and sister ribbed him all the way home about the "quilt" that Mom would make him to carry his books in.  He didn't let it get to him -- he had a vision of how to mix his red and zebra and black and brown and orange and gray fabrics.  This vision also included his favorite fabric -- wait for it-- red minky.  Even I was starting to wonder about this project.

The back side reverses to...
...the front side; lined in...

RED MINKY!
I also had doubts about using a knit as a lining for a bag that would hold several pounds of books, but so far, it has worked very well.  The Minky is slick enough that his books easily slide in and out, and thanks to the interfaced outer shell, it has held its shape just fine.
Stiffly interfaced triangles for grommets through which we loop the paracord.
To our surprise, the bag has been very helpful.  It serves as an organizer within his much bigger backpack, that he pulls out to bring to our homework sessions at the library.  He carries it between classes, and tells me that he has received a lot of compliments.  I have to be honest, I didn't expect compliments from junior high students.  The world must be a kinder, gentler place than it was when I was in 7th grade.  
It even worked well as a candy bag for trick-or-treating & even coordinated with his (self-designed) costume.
Now he wants me to attach a water bottle holder.

Monday, November 4, 2013

Vogue 8648: "The Couture Dress"

I spent so much of my life completing Vogue 8648, with "couture" techniques, I feel that  it should be documented.  Following is a post-mortem analysis of the project.

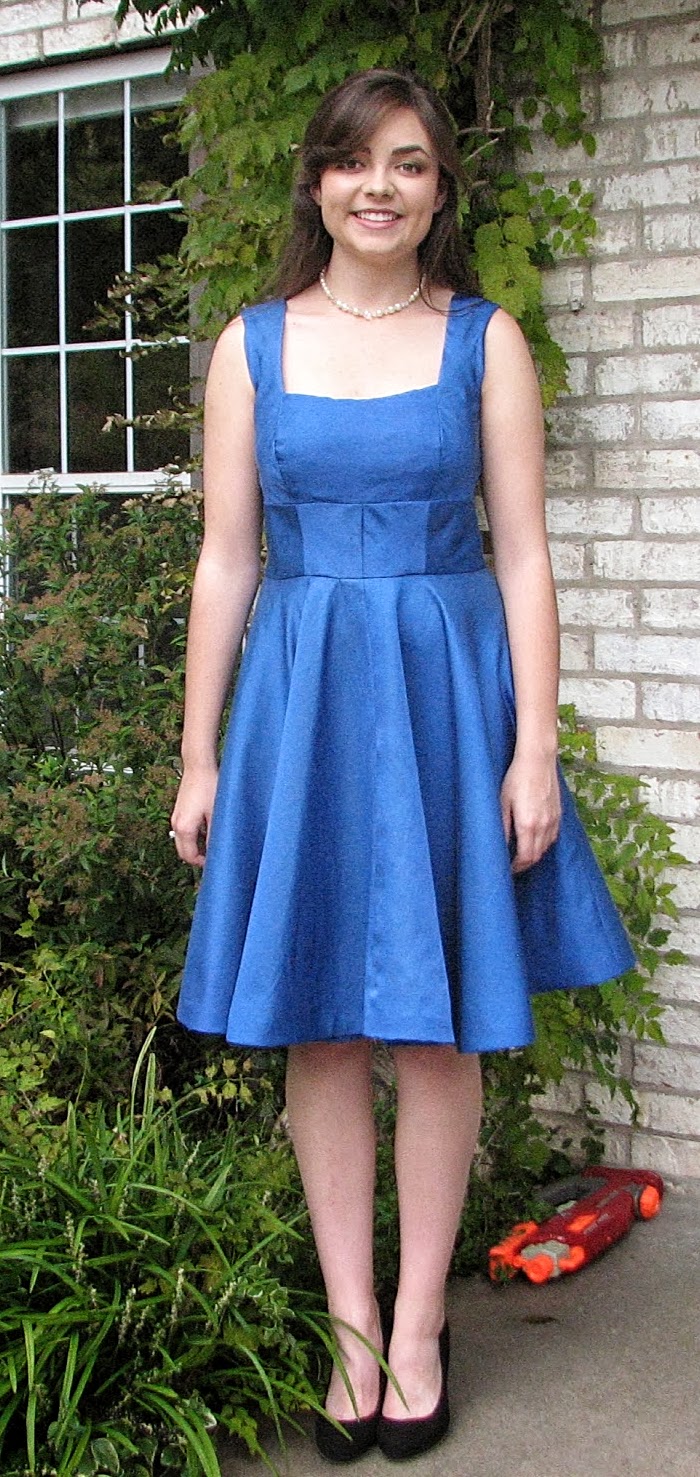
Vogue 8648, in blue silk.  Little brother's super soaker lying in wait.
First, the pattern: Vogue 8648 is not a complicated pattern. Although there are many pieces,  that just gave more opportunities for a better fit.  The time-consuming nature of the "couture techniques" are what complicated the project.

For the most part, I liked the pattern and would make it again.  I do question the extensive use of bias cuts, however.  The entire midriff section is cut on the bias.  Although this allows some "give" around the waistline, it makes the vertical seams a bit tricky.  They have a tendency to bow out a bit if you're not careful.  Of course, they are subject to stretching out of shape, as well.  Susan Khalje suggested using stays at the bias seams to counteract that vertical stretching.  It was easy to snip a few pieces of silk organza selvedge and tack them to the top and bottom of those bias seams.
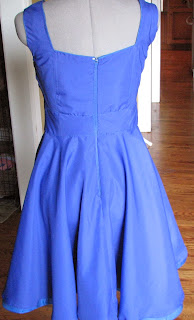
Vertical stays along midriff seams to counteract stretching.
Skirt lining is already hand-stitched in place.
Eventually, the lining covers all this mess.
The side front and side back pieces are also cut on the bias, which results in a little too much stretch along the shoulders.  Silk organza stays were used there, as well.  My fabric had already stretched considerably, so I also had to stitch in some gathering stitches in the seam allowance, and ease them back into shape.  The iron quickly steam shrunk the ease into invisibility.  Stay stitching on most of the garment also helps prevent stretching. I stay-stitched almost every single edge of the garment.

This is a pretty basic design for a Vogue -- nothing fancy included in the pattern or the instructions -- leaving lots of room for the dressmaker's creativity.  We realized a bit too late that it was on the plain side for a special occasion dress, especially since we used a solid color fabric.  My daughter suggested some embroidery, which I would have been totally into, except that we were cutting it a bit too close to the deadline.  The inspiration piece for her vision (she was serious):
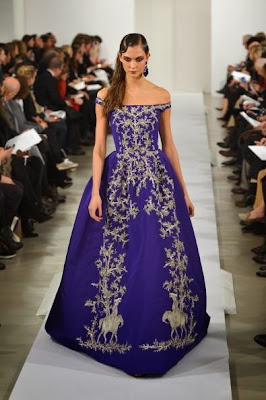
Believe this is Oscar de la Renta.  
It is lovely, but I don't own an embroidery machine, and well, I told her she was out of her mind.  I was thinking more along the lines of some simple tone-on-tone scroll work, not a tapestry.  In the end, I suggested we go with some simple piping at the neckline (self fabric).  It's very low key, and you can't really even see it in the pictures, but honestly, I was afraid of ruining the lines of the dress with something that screamed "My mom cross-stitched these Care Bares on my bodice."  I suggested she find an elegant necklace, instead (she chose one of my grandmother's chokers, also simple, but special).
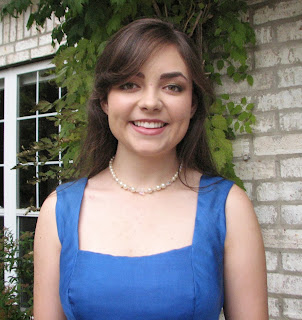
Barely imperceptible piping.
I would add some sort of embellishment next time I make this dress -- something to call attention to that lovely neckline.

Fitting the muslin:
I did not do an FBA, at least not in the usual manner.  Instead, I put it together as-is and increased width via the princess seams, lowered the apex, and lowered the bottom edge of the upper bodice once the muslin was cut and on her.  It was quicker and more accurate than the slash-and-spread FBA.

The midriff design allowed me to make a lot of changes to the fit, especially with the swayback adjustment, which was more than an inch.

The toughest issue fitting this pattern were the shoulder straps.  The bias cut, coupled with a low back neckline made the straps want to slide off her shoulders, so we fiddled with the length quite a bit.  I also drafted cap sleeves, which she nixed in the final version.

Once the dress was constructed, we took even more width out via the side seams.

Next, the fabric:
Fashion fabric: Stephanie wanted silk.  I have spoiled her, but honestly, I'd much rather sew silk than the cheap polyester that we can buy around here.  And she wanted to create her own special color.  Again, I have spoiled her, but honestly, dying is fun!

We ordered a silk/cotton blend from Dharma, and dyed it Royal Blue with the fiber reactive dye, expecting something a little bit different on the silk (rather than using a protein-specific dye).  The silk side of the fabric took the dye much nicer than the cotton side, and even though I used a much higher ratio of dye to fabric than recommended, it still didn't come out as dark as the sample swatch.  It's a pretty color -- a good color for Stephanie -- but not as "royal" as we had hoped.

Not sure I love this fabric, but I didn't dislike it either.  It reminds me of a lighter-weight Dupioni without the slubs.  The weave is quite evident, but even.  Pros: it didn't fray as much as many silks do. Cons: it curled quite a bit, and it wasn't as shimmery on the silk side as I would have liked.  Another annoying trait, was the way it behaved along the bias -- it arced into a convex shape on the silk side and concave on the cotton side.

Underlining: Not knowing what sort of hand the fashion fabric would have, I ordered silk organza to underline it.  It was mostly okay.  The fashion fabric was a bit on the wimpy side, and my first thought was that the organza was too stiff, but in the end, it added the right amount of body for the skirt.

Lining: I assumed that I would be able to find a nice Bemberg Rayon lining locally. Nope.  Joann's did have a very nice poly lining that felt like Bemberg, and it worked out fine -- it was a Walmart Blue [exactly the color of my reusable shopping tote], slightly different from the fashion fabric, but you never see it anyway.  It was very nice to work with, and Stephanie thought it was comfortable.  I would definitely use it again.
Lining side out: Joann's "posh" lining.

Finally the techniques:
Every single seam is catch-stitched to the underlining.  Before this project I LOVED the catch-stitch.  Even mid-dress, I still loved the catch-stitch.  I have actually thought of writing an Ode To the Catch Stitch, extolling its beauty as I move my needle quickly through the fabric, leaving behind those lovely diagonal marks.  I looked for opportunities to use the catch stitch whenever possible.

I am so over the catch stitch now.  I see the benefit of this technique, which is only really possible with an underlining to which the stitching is anchored (without showing on the front side of the dress).  It just became so utilitarian to me after stitching it thousands of times.

Hand basting: The underlining is hand-basted to the fashion fabric and the individual pieces are initially hand-basted together for fitting.  I used this method with my tweed jacket, and it was completely worth the time to do it.  It gives you so much more control -- especially when pattern-matching or plaid-matching.  The pain is taking all that basting out after you've machine stitched it.  It's still worth the trouble.

Stays: As previously mentioned, stays were tacked in wherever there was any question about future stretching: all the bias seams, shoulders and shoulder straps.  I even toyed with inserting boning along many of the bias seams (removed in the end).  

Love the hand-picked zipper.  I can't believe that I've never used this technique before.  It makes zipper insertion so much easier.  I'm not sure it took me any longer to hand-stitch it than it would have to machine stitch it, and it allowed me to align the adjacent seams so neatly.  In fact, it was probably quicker to hand-stitch it than use the machine, because I so often rip out a zipper to re-align it.  The zipper seam is stabilized with silk organza selvedge.

Horsehair braid in the hem.  Also hand-stitched.  Five and a half yards of it.  First the bottom edge, then the top edge, then covered it with the hem, and stitched that by hand.  With the Catch Stitch.  It gave such a nice effect for a circle skirt, that I will definitely use it again.  Next time, I will order the kind with the string that allows you to shape it to the hem, though.

Lining is hand-stitched to the underlining.  Another really interesting technique that I wouldn't mind using again.  Much better looking final product than the method where you machine stitch the garment to the lining, try to under stitch it by machine, etc.  Under stitching is done by hand as well, and I actually enjoyed that part of the process.  This allows you to make little tiny adjustments as necessary (say when the lining is a slightly different width than the garment). The final product is really worth whatever extra time this takes.

Conclusion:
I would make this pattern again -- probably for Stephanie, not for myself.  There are lots of great ideas to use here and there.  I will most certainly insert a zipper by hand, and hand-stitch a lining in the future, but I can't imagine putting another one of these together anytime soon.  I did not keep a formal tally of the time I spent on this, but it consumed many hours over several weeks.  In the last week alone, I probably spent 40 hours on it, rushing to finish it on time.
The requisite scooter shot.


Wednesday, October 30, 2013

Sabbatical

Several weeks ago, I received a call from senior management informing me that my job was being eliminated.  It wasn't a big surprise to me -- my now former industry had experienced price erosion for quite some time, and I survived several lay-offs, always surprised when my job was still intact.  You may wonder why I didn't look for a new job, knowing mine was in danger as long as I did.  The truth is, I just liked working there.  Ironically, my lay-off came in my seventh year with the company, so I'm calling it a sabbatical.

That Wednesday in mid-September was my last day at work.  I immediately settled in comfortably to my new role as a stay-at-home mom.  The timing of the lay-off worked well for my family, who had suffered from my business trips and working on weekends.  We decided it was a perfect opportunity to take care of the family.  My son is the beneficiary of my tutoring skills, my daughter claimed my extra time for her sewing projects and my husband, well my poor husband is probably still waiting to see more of me.  I seem so much busier now!

Butterick 5850: no surprises that the neckline was high...
Meanwhile, back at the ranch, my daughter decided that Butterick 5850 *EASY* pattern  that she selected in August for an October event would not work for her after seeing herself in the muslin. The neck height in the back would definitely be too hot to dance in.  Frustrated, I told her that she could select a pattern from my stash, as I wouldn't be buying another.  Surely she could find a suitable pattern among the dozens hiding throughout the house.  Vogue 8648 just happened to be sitting around, while I viewed Susan Khalje's "Couture Dress" class over and over again on Craftsy.  Stephanie decided that it would be okay for a homecoming dress.  I now had all this time on my hands, and was itching to put my mad couture skills to work, so I agreed to make it.  The timing seemed so good!

Well, I'm not sure making a couture dress was the sabbatical that my husband agreed to sponsor.  In fact, I'm pretty sure he expected a cleaner, more organized house, a happier wife and better behaved children.  Instead, he got a dining room covered in silk organza scraps and loose basting threads, as his wife became obsessed with a new project.   At least the kids' behavior didn't get any worse.
"Please don't TOUCH me!"
On a positive note, Stephanie's reviews were enthusiastically favorable:
 - Favorite dress so far, at least ones that I've made for her [thank goodness]
 - Prettiest: it has a vintage vibe, with the circle skirt and a flattering neckline
 - Most comfortable: we did spend more than a week fitting the muslin, and it's nice and airy for dancing

Me?  I'm relieved that it was finished in time (an hour before go-time), and she likes it.  We didn't include any elaborate ornamentation, or any embellishments, but it's a dress that should serve her well in the future.  I am ready for a quicker project.  I bought Simplicity 2153 yesterday.  For myself.

My husband?  He's ready for me to finish organizing our house.  I didn't tell him about Simplicity 2153.


Wednesday, September 11, 2013

Dreaming of Sewing "The Couture Dress"

I haven't sewn much lately.  I had very little inspiration this summer, and now that the kids are back in school, I'm barely able to keep up with them in the evenings, let alone find time to sew.  Although I have been strict about making time to exercise every day.

Losing weight hasn't helped inspire me to sew, either.  Most of what I've made myself in the past year is a bit baggy, and I intend to continue shrinking, so don't have much incentive to sew for myself - yet.  Of course I could be taking apart clothes and altering them to fit my slightly smaller figure, but that seems so boring!  Why rip out seams and sew them back together when you can handle a beautiful wool crepe or silk taffeta?  Maybe even add some horsehair braid to the hem?

While riding my exercise bike, I watch a sewing-related video.  At least I can enjoy sewing vicariously through someone else!  Not long ago, I started "The Couture Dress" with Susan Khalje.  What a great class!  I've taken several Craftsy classes, but this is by far my favorite.

Even though I'm not learning a lot of new techniques, I love just watching.  Susan's teaching style is sublime and I enjoy seeing the dress come together, so gracefully.  She sets the bar high.  So high that I'm reluctant to start a dress of my own for fear that I will disappoint myself.  I actually started watching it a second time.  At the very least, it will reinforce some good habits for me.

Next up is my daughter's homecoming dress...if I can ever get her to decide on a fabric.  She selected Butterick 5850 several weeks ago.  It's an "easy" pattern, but I'm sure I will find a way to complicate it.  After witnessing my orange dye debacle, she is actually considering a custom-dyed fabric (in silk, of course).  We'll see.  If she waits much longer, it will be a polyester taffeta from Hancock.
Butterick 5850 (butterick.mccall.com)


Monday, September 9, 2013

The Tangerine Bow Tie

My husband prefers to wear a tuxedo for evening events.  Even if they're not specified as black tie events, if it's after six, he's in his tuxedo.  I do believe that it is always better to be over-dressed than under-dressed, and I'm quite impressed that he can still wear the suit he wore to our wedding!  Not to mention how easy it is to put an outfit together for a formal affair.  I'm envious.
He usually wears the traditional black tie, but for the last two "Color" events he has asked me to make a bow tie to match the color theme.  Last year, I made a green tie using the same satin as my daughter's jumpsuit, using Angela Osborn's free pattern.  It's a good pattern, with great instructions, but it probably would work better with a cotton fabric that isn't slippery, since it is a tie that needs to be tied on the wearer, not one with adjustable hardware that just snaps in back.

Of course it was a last minute thing, and we really didn't have time to re-make it after realizing that it was on the small side.
A little small, but really not too bad.
This year, I pressed him to wear a suit with a "normal" tie -- "you can find an orange tie at Dillards," I suggested.  Nope.  He just bought a new tuxedo shirt, and was insistent that he would wear his tuxedo.  "Besides, I want to match you."

For the tangerine tie, I decided to use a commercial pattern (Vogue 7104) which is adjustable, but requires hardware.  I ordered the hardware from WAWAK, with a couple of weeks to spare.  A couple of weeks is really planning ahead for me.  Apparently not far enough, though.

The package arrived from Fed Ex a couple of days after I placed the order, empty!  The envelope opened during shipping and the contents were lost.  No problem, they can re-ship it, we still have more than week before the event, right?  Nope. The hardware was back-ordered.

So I made Angela Osborn's version again, this time a little bigger.  Steve decided that it needed an extra 2" in length.  That seemed a bit excessive to me, but he's usually good at estimating.  We both thought the width of the bow needed to be expanded slightly, as well.  The orange silk charmeuse that I dyed for my underlining was so striking, and he really wanted it for his bow tie.  I thought it would be nice for it to be seen, since it really wasn't all that noticeable as an underlining.

The charmeuse was slip-slip-slippery -- as any idiot would expect -- and a little too floppy for a bow tie.  I underlined it with silk organza to give it some structure (I don't really like the look of a fusible behind silk).  I added 2 inches to the length, and an extra 5/8" to the width.  It came together rather quickly, although cutting small pieces of charmeuse on the bias is a bit fiddly.

It took me even longer (almost an hour) to tie it!  The silk was so slippery, the length was a bit too long, and the width was slightly clownish (at least on the tail end -- you can see below).  But it was the day of the event, and I couldn't talk him into going back to his black tie.
This was probably the best it looked all night!
Since it was so slippery, the tie moved all over his neck throughout the evening, requiring constant re-tying and re-positioning.  At one point he came out of the men's room and mentioned that it was hideous.  I laughed (but had to agree), and re-tied it.  It looked good for another 20 minutes.

My bow tie hardware from Wawak arrived about a week after the event -- a full dozen sets of bow tie hardware.  So I will eventually try Vogue 7104.  I'll wait for everyone to forget about the tangerine tie, though.


Friday, September 6, 2013

My mis-adventures in dying lace

As referenced in my review of Vogue 8766, I was very disappointed in how the cotton/nylon lace took the dye. I was also shocked, because I've been so pleased with Dharma's Procion dyes in the past and my test swatch was gorgeous.  I was going for a nice deep tangerine, but got an orange sherbet instead.  To make matters worse, it was an uneven orange sherbet:
Bodice is a bit darker than the skirt!
This was user error, for sure.  A couple of things may have gone wrong.
(1) Not enough dye for the fabric, or too much fabric in the pot.
(2) Too much acid, too early?

After mulling my choices for dye, I settled on the Procion dye, which works best on plant fibers such as cotton or linen, but will work on silk if you add vinegar to the dye bath.  I thought that would be fine, because I would dye the lace and silk separately, and I didn't want to get two different dyes and risk having them clash.  Unfortunately, I forgot that the lace was cotton on a nylon mesh.  The nylon needs the acid, too.  Oops.  

After several different dye/chemical/temperature combinations, I found a really nice color that dyed both the cotton and the nylon.  Heating the dye bath and adding vinegar (fixative for nylon) about 15 minutes after adding the fabric, then adding soda ash (fixative for cotton) gave me a perfect color.  If I didn't add the vinegar, then the mesh didn't take the dye.

Using Rit would have dyed the cotton and the nylon about the same color, but I know from experience that it would fade quickly.  And continue to fade.  And maybe fade directly onto my skin.  And maybe ruin your washing machine (true story).  I don't like to use Rit.  

I still haven't figured out what caused the irregular color on the lace, though.  Maybe I had too much fabric for the size of my pot?  It was a lot of fabric, and the cotton has an irregular surface.

The silk took the dye perfectly.  I loved looking at this while I was sewing the dress and just wished that my main fabric had come out this nicely.  Ignore my shadow in the bottom of the picture -- it's really all the same beautiful color all over.  

My interest in dying fabric hasn't faded...especially if the fabric is silk.  I will be more judicious about what fabrics or combinations of fabrics I use in the future, but I'm still fascinated with the process of creating the perfect shade for my projects.

Thursday, September 5, 2013

Orange-you glad Vogue 8766 is finished?!

Mixed reviews on Vogue 8766.  Sadly, I do not love the outcome, which may be why I haven't made the time to document it.

After all the time I spent fitting the blasted muslin, I was doubly disappointed when the lace did not dye as well as I would have liked.  More analysis on that later.  The silk DID dye to a gorgeous, perfect tangerine, though.  I just wish it were more visible under the lace.

My husband loved the dress.  My son told me I looked like Grandma and my sleeves were too short.  My daughter told me she liked it, but I got the feeling she was just being kind.  I thought it was comfortable. Like I said, mixed reviews.

Here we are, in all of our tangerine glory (this is the best picture I have of myself -- I wasn't in the mood to pose):
Color of Hope 2013 (Tangerine)
photo courtesy of Celebrate Arkansas Magazine

Everyone wore something sewn by Mom:
 - Daughter: wore her prom dress from 2012 -- LOVE IT when a gown can be worn more than once!
 - Husband: bow tie is the the same silk underlining my dress -- more on that hot mess another day
 - Son: pants were hemmed by me, in the minutes before we left for the gala when we realized they were 3 inches too long
 - And there I am in my orange monstrosity -- smiling -- because the dress really is comfortable!

My review, Vogue 8766:
Pattern Description: Lined dress has underlined bodice variations and narrow hem...all garments are cut on the crosswise grain of fabric.  I sewed view E.

Pattern Sizing: AA(6-8-10-12), D5(12-14-16-18-20).  I cut a 12.

Did it look like the photo/drawing on the envelope?
Yes, for the most part.

Were the instructions easy to follow?
I thought so.  Although it was an "Easy Vogue", the fit gave me fits (no fault of the instructions). I made three muslins before I felt it fit me well enough.  I finally swapped the darts for shoulder princess seams to get it to fit me nicely.

What did you particularly like or dislike?
Like:  Construction is straightforward and simple, and I thought the instructions for sewing lace with an underlining were easy to understand.  I really like the effect of the darted sleeves and may steal this to attach to another pattern in the future -- they were much easier to sew than the eased variety, and the darts add nice structural interest.
Dislike:  The bodice darts.  I replaced them with princess seams.

Fabric used: Silk charmeuse as an underlining (Dharma Trading, dyed by me).  Cheap cotton/nylon lace on top, also dyed (a mistake that I will not make again).

Pattern alternations or any design changes:
 - Shortened sleeve length to just under the elbow.
 - Added princess seams to manage fitting challenges.
 - FBA (this was a first for me, I usually do not need that)
 - Swayback
 - Expanded the circumference of the size 12 by several inches in the first muslin, took out about half the original expansion in the second muslin, then went back to the original 12 and settled for nothing more than an FBA in the third.

Would you sew it again?  Would you recommend it to others?
Not sure if I would sew it again for myself.  I would love to say "yes", since I spent so many hours fitting it for myself and it is a very comfortable dress, but I am not sure I love it that much.  I may consider making the view with a fuller skirt for my daughter.  I've seen enough nice versions of this dress to believe that this just may have been a personal problem, so I may recommend it to others.

Conclusion:
This was a bit disappointing.  This pattern was so well-reviewed by others, that I expected a quick slam-dunk.  Part of the disappointment was my lace fabric, part was the fitting troubles. I normally do not have fitting challenges, so was thrown by excessive time I spent making muslins.  I do love the darted sleeve, and I am going to keep the pattern around for that aspect.

Monday, August 12, 2013

Toxic Relationships

Have you ever found yourself in a painful relationship? One that you really want to work, but becomes detrimental to living a productive life? Maybe it causes you to question your abilities, or perhaps lose confidence in yourself altogether?  Maybe you even have a poor body image because of it?  No matter what you do, how hard you try, you don't think you can ever work things out?  No, I'm not airing my dirty laundry, this blog is still about sewing...this is where I found myself with Vogue 8766 late last week.
Vogue 8766, View E.

Now that my tweed jacket is finished, I don't have any UFOs and I'm not one to throw in the towel, especially with an "easy" pattern.  Especially not one that was reviewed so well by so many people all over the internet.  But I just could not fit the muslin to look flattering on me.  The darts didn't work on me, my back appeared as if I had an extreme case of scoliosis, and if that wasn't enough, the waistline appeared to be the same circumference as the bust and hips. A sack of potatoes may have looked better.  Moving the darts didn't help, making them larger didn't help, everything I did seemed to make it look worse.

Starting from scratch with muslin #2 would surely make a difference...NOT!  I went to bed on Thursday night wishing that I could just have a good cry and feel better.  My confidence was completely shot -- I kept telling myself: "You have sewn Advanced Vogue patterns without a muslin that came out lovely, and this is an EASY pattern."  "It can't be THAT hard."  "You are a nice person, and people like you." Well, not the last sentence, but I probably should have tried it.

Friday afternoon I decided that I just could not -- would not -- work with THAT pattern.  Actually, the skirt was okay, it was just the bodice that looked awful.  I toyed with starting over with a new pattern, but decided that the answer was to re-draft the bodice with princess seams that are (hopefully) easier to fit.

Saturday morning, I broke out my "Perfect Fitting" book by Sarah Veblen.  Finally, on Sunday night, I accepted my fourth muslin as the final and declared that I would move forward with that version.  I still don't love it, but I'm running out of time.  I know it sounds like a marriage of convenience.

If I didn't have a hard deadline of a week from yesterday, I would definitely have started over -- new pattern, new fabric, new attitude -- but it must be finished by this Sunday, before I leave for a week long business trip.  AND I still have to dye the fabric.  [That will be another can of worms all by itself.]

I still haven't figured out why this was such a difficult chore to fit this for myself.  Is it because I bought a smaller size and tried to increase the waist (by the way, I ended up taking more than half the increased circumference out of the final version and I still have room to move), or is it just that this style does not work for my body type?

Thursday, August 8, 2013

It's not that I haven't been sewing...

...I've just had really b-o-r-i-n-g projects.  You know the type: mending, altering, etc.  Not interesting enough to blog about.  Most boring among the long list of forgettable projects: outdoor curtains.  My husband has wanted some for several years, and demanded hinted that I should put them on my docket for this summer.  Unfortunately, summer will probably be over before I finish them.  All white fabric and so many straight seams!  I've only completed one (I think the plan is for 6 or 8), but I need a break -- something fun!

Dresses are normally not my thing, but we have an event later this month for which I really should wear a dress.  So, I'm making one: Vogue 8766, view E. It is well reviewed on Pattern Review and billed as "easy".  This particular event has a color theme every year -- 2013 is the year of Tangerine -- so while awaiting the arrival of my tangerine dye from Dharma Trading, I started fitting a muslin.

My shoulders have recently become narrower in proportion to my waist.   My usual method for handling my disproportionately large waistline is to get a pattern that fits me in the waist, and reduce the shoulder width.  That hasn't always given me the best results, and I understand that I should do the opposite -- buy a size to fit my shoulders, and expand everything else.  It sounded so simple.

Threads #101 has an interesting article about grading patterns, which was helpful for me to figure out where to slash and spread the tissue.  It involved a little bit of math -- which always makes the project more fun, and gives me the peace of mind that I'm using a scientific process.

In a nutshell, you figure out the difference between the pattern measurement and the body measurement, which is the "overall grade." Divide that by 4 to get the "allocated grade" (AG, allocated between four pieces).  The allocated grade is then further allocated between three lines (hash marks, below) per body quadrant.  For the body measurement, I allowed for ease, by assuming the same ease built into the pattern (so if drawn for a 25" waist, and the finished waist measurement is 27", waist ease = 2", so I added 2" to my waist measurement).

The Threads methodology drawn on my pattern.

Changes to bodice patterns
In this particular project, I needed an extra SIX inches in the waist (hard to believe that I've lost a couple inches there in recent weeks), so that six inches in overall grade became 1.5 inches in AG, divided into 3/8" or 3/4" spreads at the waistline, detailed in the table above.

The bust (apex) and hip lines required only about 1/2" additional, which worked out fine for a wedge slashed into the pattern: wide at the waist and tapered toward the top and bottom edges.  After all the wedges were in place so that the tissue was flat, I re-drew the grain lines and blended any other lines.

Muslin #1 neglected to take into account the additional required for bodice length (duh), so it was a bit too short in the front (not as much in the back due to my sway back).  Unfortunately, I ignored this great tool from Threads and I only increased bodice length along lines #5 (front) and #10 (back) where the patterns had markings for "lengthen/shorten here."  It would have really been better to use line #4 also -- at least in the front -- because I ended up lowering the bust darts and armscye, anyway. By the way, the Threads table didn't seem to allocate enough in the vertical direction to meet the overall grade -- my table is adjusted to reflect the increase.

In the process of fitting, my husband learned how to pin out excess fabric for me!  He did well on his portion -- the back looks pretty smooth.  I'm still not all that happy with how the bodice fits me along the side seams, but I'm saving that for later, since it should be an easy fix that I can pin out myself.  The skirt seems perfect, though.

I'm still not sold on the new process -- I do feel like I'm making many more changes than I would have using my old method.  However, if it results in a better end product, it's worth the trouble.  After working on this over the weekend, I realized that Linda Maynard teaches a Craftsy class on fitting that uses this exact pattern.  Seems like that may have made it easier for me.

So, how do those of you experienced in the art of fitting usually buy your patterns and fit them?  Am I the only one who has been doing it wrong?!

Wednesday, July 17, 2013

Lazy, Hazy Days of Summer

I may have lost my interest in sewing.  Actually, I am still quite interested in sewing, just not interested in doing it myself.  I can't bring myself to open up the tissue, trace a pattern, make fitting changes...the sewing is fine.  Just don't want to do the all-important pre-work.  I have done a few small projects -- but haven't opened a pattern envelope in quite some time.

A few weeks ago, I saw this Eileen Fisher piece and it looked so easy to make.  Nordstrom's website even gave me some measurements:
Very simple - cut-on sleeves, no darts.  The asymmetry is the biggest complication, and they gave me the measurement!  So I started draping my own version immediately.  Never mind that I am not built like a fashion model...my version needed shaping, so I put darts in the front and pleats in the back, and I ended up making my sleeves a little longer.  It's still pretty baggy, but not as tent-like as it may have been.
With my daughter and the biggest crape myrtle I've ever seen.

Not a great photo to show off the top.  It also doesn't show that I accidentally sewed the short side of the back to the long side of the front.  But in the spirit of "there are no mistakes" (and "I'm feeling too lazy to unpick this seam"), I left it.  So, it's doubly asymmetrical.  Which I don't mind at all.  It is really comfortable, and great for a (hot) weekend day.  I also wore it to a fancy garden party with some nicer pants and a silver belt, and didn't feel a bit out-of-place.  The fabric is a linen/cotten blend from Hancock -- optic white that I dyed "dragon fruit" with Dharma's procion.  This was my first time sewing with a linen and I really loved it.

The pants I'm wearing in the photo are about ten years old -- which is REALLY old for white pants -- I usually wear them out or stain them too much after one summer to wear them again.  After all the hot water washes to keep them white, they had shrunk in the length just enough that I wasn't comfortable wearing them any longer, so I sewed a small casing, and turned them into a comfy pair of summer cargo pants.

My daughter thought it was a really weird get-up.  And it probably is, but that's all I've got to show for my summer, so far.  And that may be all there is.  I'm reading about sewing, watching some sewing videos, and of course reading a lot of blogs, but I just can't get excited about doing much of it myself.   


Friday, June 21, 2013

Creative Block

I'm at a creative standstill...I have yards of fabric, many, many patterns, but no drive to dive into a new project.   Nothing sounds interesting enough to me to make it worth my effort.

My daughter is away for most of the summer, attending a program three hours from home, so we don't even see her on weekends.  Although it is nice to have a relatively clean home, I do miss her company.  If she were here, I wouldn't be "blocked" on what project to start next.  She would suggest something (for herself, of course).

It's not that I don't have any projects on my "list".  I have several potential projects, including most of my SWAP items.  I am just missing the motivation to start one of them.  So I was a bit excited when I picked up my son's t-shirt for his robotics camp.  They handed me an adult medium --that looks like a large -- and he's not even a small.   

Sam: "It's like a dress.  Look!"  (Frowning.)
Grandma: "Just wash it and dry it on a hot cycle several times, and it will be fine."
Mom: "It's pre-shrunk, and it wouldn't shrink that much.  I can fix it, trust me." (Rubbing my hands together.)
Sam (with a doubtful look on his face): "Okay, fine."

Did I say I was excited?  About a cheap t-shirt? It was an opportunity to sew with a cotton jersey knit that I didn't buy, and he probably won't wear it again anyway.  Add to that -- I got to sew for my son.

It was a snap. I did it the easy way, though, by just using a jersey shirt that does fit him as a template.  Although I briefly considered deconstructing the sleeves, cutting it all down and putting it back together again.


The "jersey" stitch on my 930 worked out great for the hems -- it's not a cover stitch -- but fine for a kid's camp shirt.  The hems have even survived a couple of rounds in the washer/dryer without flipping up like they usually do on t-shirts (as in the original, above).  The "vari-overlock" stitch worked well for the seams.  And that was it -- he wore it comfortably to camp.


Sunday, June 16, 2013

A New Gizmo

I love my sewing machine.  My grandmother gave it to me several years ago, after realizing that she just couldn't sew anymore. It may be my most treasured material possession.

It's a Bernina 930 -- a workhorse that I've used to sew clothing, draperies, quilts, upholstery and even a very heavy fabric awning.  It sews a multitude of stitches, many of which I have never even tried.  However, it doesn't make great buttonholes.  It makes decent 5-step buttonholes, but 9 times out of 10, I choose to hand-work a buttonhole or make a bound buttonhole.

Several times I have considered purchasing a newer computerized machine with all the fancy options, but I was mostly happy with my 930, and just couldn't justify buying a newer machine.  Then I realized that with my short shank presser foot adapter, I could use this with my 930:
Greist Vintage Buttonholer, style #1
It was patiently waiting for me on ebay for the low price of $18, which included shipping.  This model is from 1956, and it arrived in perfect shape.  It makes nice buttonholes with five little templates and even comes with a keyhole version.  I used it for the buttonholes on the waistband of my red pants.  It was fun to watch, simple to use and they came out very nicely.

The width of the stitch is adjustable and the stitching will appear thicker by running it around more than one time.  Here is the 1 1/8" keyhole buttonhole in contrasting thread:


I'm still figuring out the nuances of lining up the fabric and stitch width, but it's super fun, and I'm very pleased with my purchase. I'm a little worried that I may never hand-work a buttonhole again!

Friday, June 14, 2013

Spring Cleaning

My husband has been politely reminding me to get my sewing room cleaned up for quite some time.  Why does he care what my sewing room looks like, you ask?  Well, because my sewing room is actually our dining room!  It is really a nice place to work: it has great natural light, it's near the kitchen, and the table quickly expands to 96".  Unfortunately, I also tend to pile my fabric and patterns and tools on it, too.  So I agree, it can be quite messy.

Several years ago, we realized that we rarely used the dining room and my husband had the idea to convert it to a "craft" space for the kids and me.  A few friends (including real estate agents) warned us not to do it, but we had no intentions of selling in the near future.  We added some built-in cabinetry to house the supplies, as well as a pop-up mechanism for my sewing machine, so we can quickly hide it when we do use the room for dining.  In theory, it would work as both a formal entertaining space and a sewing studio.

In practice, I have taken over the entire space with my various projects and the cabinets are over-flowing with fabrics and patterns and notions, and things are rarely put out-of-sight.  Sometimes, I start a second (or fifth) project before cleaning up the previous project(s).  I'm just not very organized.

Fabric waiting to be sorted
So I began by pulling out the contents of the cabinets, piling it on the table and started sorting through it. In order to get a better idea of what I was storing, I measured the fabric and cataloged everything.  Even after throwing out the smaller, unusable pieces, I have over 80 fabrics in my stash!  Most of the fabric is left-over from previous projects, but 35 pieces are at least a yard in length, and 20 pieces are completely unused.  Before my clean-up, I had no idea that I had a hoarding problem.  Okay, I knew I had a hoarding problem, now I recognize the extent of it.  I have sworn off purchasing any more fabric until I've worked through some of the stockpile.

Fabric Catalog (in Excel)
The cataloging slowed the process a bit, but after seeing how much fabric can be stuffed into the cabinets, I wanted to have the inventory information at my fingertips, mainly so I can avoid any future impulse to run out and buy more fabric (at least until I've worked through most of this).  It's a simple Excel spreadsheet, making it easy to filter by color, content, size, etc., so in theory, it should be quite useful for me to find a fabric quickly.  We shall see.

I now have a lot more space for storage and I know where everything resides (or is supposed to reside).  I even set myself up with a little system where I have a fabric storage bin to hold everything I need for the current project (assuming there is only one), and it's easily stored during any hiatus in sewing or for entertaining dinner guests.  It sounds good, in theory.


Friday, June 7, 2013

Love my red jeans!

My red jeans were a ton of fun.  I initially thought that all that red would be too wild for pants, but after toying with the idea of sewing pedal pushers or shorts instead, I decided to sew them long anyway, if for nothing else but to experiment with the pattern.  I also comforted myself with the fact that I do live in Razorback Country, so red pants are probably always socially acceptable here.


As a reminder, I "cloned" a very comfortable pair of RTW pants.  The RTW aren't jeans, they're  Jones New York dress slacks in a slightly stretchy RPL that looks like wool. I love them so much, I'm afraid I will wear them out, so I want to make a few extra pairs for myself.  I was a little concerned about how denim would fare with this pattern -- even if it is stretch denim -- but it's been fine.
Draft of pants front pattern - pockets added.
My dress pants do not have pockets, which I find rather annoying, so I added them to my pattern.  Because pockets that pop out can also be annoying, I utilized the pocket stay method, where the pocket runs from the outside seam to the fly.  In order to help contain the stretch along the bias (thus utilizing my pocket stays as a built-in girdle), I stitched two semi-circles that roughly follow the bias of the inside pocket piece.  That's in addition to cutting them so the lengthwise grain runs crosswise, which reduces the capacity to stretch a bit more.  Next time I should probably just use power net!
Pocket with bias-controlling stitches (in red)

I picked up some really fun, multi-color paisley quilter's cotton in coordinating shades to use for pockets, waistband facing, bias tape and bias hem facing (since they weren't quite long enough for even a 1/2" hem).  The coordinating cotton is what has made this project so enjoyable.  I'm not normally a paisley fan, but it really works with this crazy denim.  The red center of the "amoeba" matches my red perfectly.  I found as many uses as possible for the paisley.


Pocket applique'
I finished them Saturday morning and wore them the rest of the day to run errands.  The only thing I would change is to reduce the ease a bit, since the denim has a tiny bit of stretch.  They are really comfy and I am surprisingly not self-conscious about gallivanting around in bright coral-red pants.  The pattern is a keeper, too.